Before installing a shower system, assess the environment, drainage, ventilation, and budget, then plan sequencing and contingencies. Select compatible components and a layout that aligns with plumbing routes and maintenance access. Measure precisely, size pipes and traps correctly, and document torque values. Execute in a logical order, perform pressure testing, and proceed to sealing and joint preparation. Substrates must be clean and prepared, sealants applied evenly, and curing timed. The outcome hinges on meticulous execution and careful documentation as complexities emerge.
What to Know Before You Start Installing a Shower System
Before beginning installation, it is essential to assess the environment, materials, and safety requirements to ensure a successful outcome. The analysis covers space constraints, water flow, drainage, and code compliance.
Consider ideas about energy efficiency and budgeting for materials to optimize long-term performance.
A methodical plan clarifies sequencing, tools, and contingencies, reducing waste, risk, and rework while preserving freedom to adapt as needed.
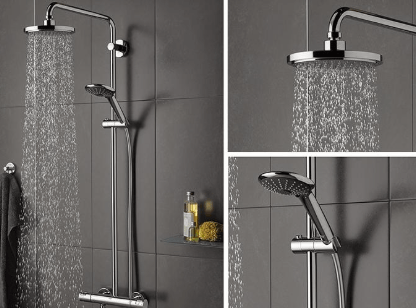
Choose a Layout and Gather Compatible Components
Selecting an optimal layout and assembling compatible components requires a precise assessment of space, plumbing routes, and load considerations, followed by matching fittings, fixtures, and materials that meet code and performance goals.
This stage evaluates layout options for shower flow, access, and maintenance, while confirming component compatibility across valves, drains, enclosures, and waterproofing to ensure reliable operation and future serviceability.
See also: What Are NFTs in the Crypto World
Step-by-Step Plumbing Installation Basics
The procedure emphasizes measurement accuracy, secure mounting, and proper pipe sizing, with attention to bathroom ventilation and water pressure.
Clear valve placement, waste routing, and trap integrity prevent leaks.
Documentation of material specifications, torque values, and test pressures ensures reliable performance without compromising safety or future maintenance access.
Test, Seal, and Finalize Your Shower Setup
The procedure begins with pressure testing and leak verification to ensure system integrity before sealing joints. Upon confirming no leaks, test procedures guide joint preparation, substrate cleaning, and joint movement allowance. Sealant techniques are then applied with even bead width and cure timing observed. Finalization includes removing excess material, inspecting for gaps, and documenting results for long-term performance and freedom from leaks.
Conclusion
In the quiet language of measured temps and careful cuts, the shower system settles into its rightful place. Each joint, a deliberate hinge of trust; each seal, a whisper of endurance. The plan unfolds with the rhythm of pipe, depth, and torque, leaving no room for guesswork. When test days illuminate its quiet integrity, maintenance becomes second nature. The result is not mere water, but a practiced environment where function and control converge, and certainty flows.